

 A-Pillar A-Pillar |
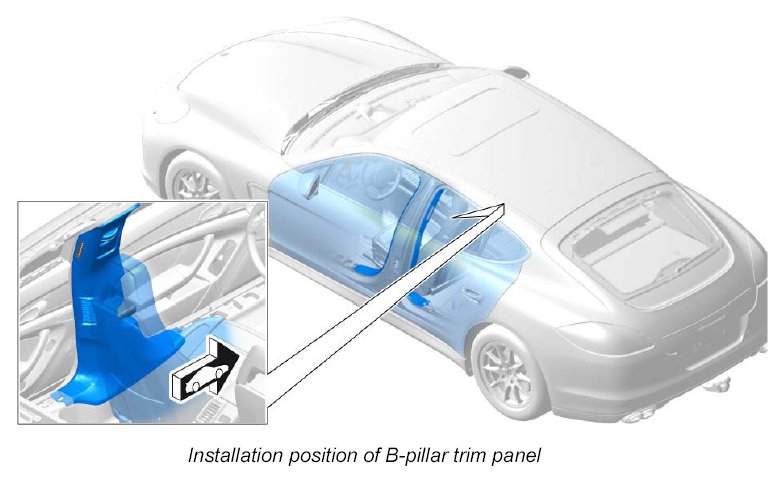
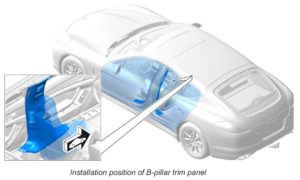 Upper B- Pillar Upper B- Pillar |
| Lower B – Pillar |
C – Pillar |
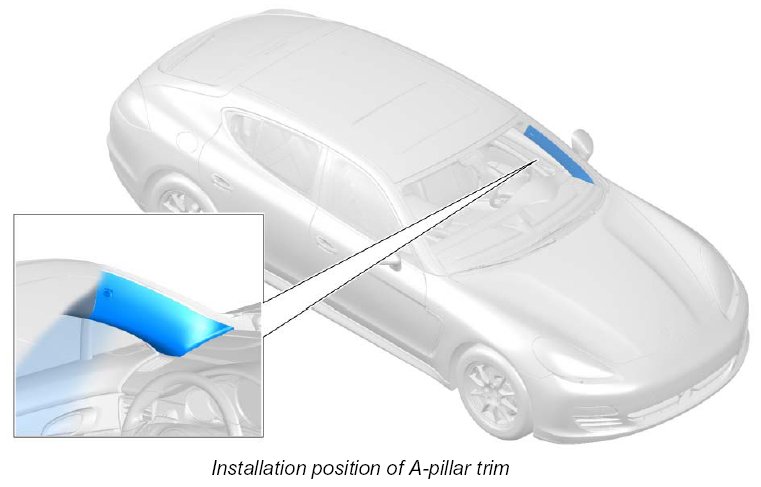
Removing And Installing A-pillar Trim Panel
Removal

- Open cover -1- of A-pillar trim.
- Unscrew the fastening screw -2- .
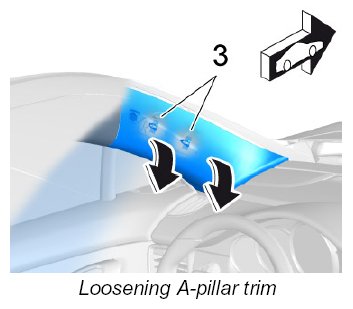
- Loosen A-pillar trim.
INFORMATION: To reduce the unclipping forces and thereby the risk of damage during removal, the removal steps must be carried out at the accessible connection points using a suitable tool.
| 3.1. | Release fixing clips -3- . |
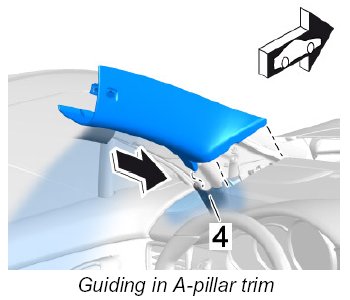
| 3.2. | Guide a plastic wedge into the joint between the A-pillar trim and front side panel trim. |
| 3.3. | Unclip A-pillar trim by turning the plastic wedge -A- . |
| 3.4. | Remove A-pillar trim in an upward direction -B- . |
Removing And Installing Upper Part Of B-pillar Trim Panel
Preliminary work
- Remove cover for backrest.
- Detach belt fitting at the seat.
- Remove air vent in B-pillar.
Removing upper part of B-pillar trim panel
INFORMATION:
- To reduce the unclipping forces and thereby the risk of damage during removal, the removal steps must be carried out at the accessible connection points using a suitable tool.
- To remove the upper part of the B-pillar trim, the cover panel on the belt adjustment system must be at the upper end position.
- Set belt adjustment to upper end position.

- Detach upper trim panel mounting.
| 1.1. | Remove cap -1- . |
| 1.2. | Unscrew the fastening screw -2- . |
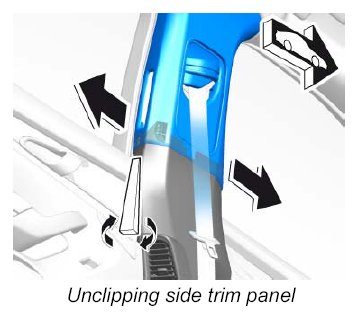
- Unclip the side trim panel.
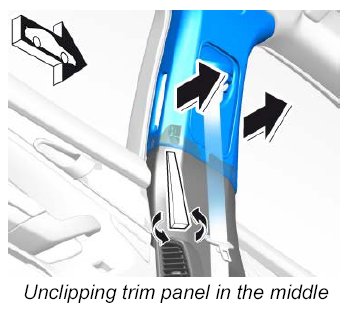
- Unclip trim panel in the middle.
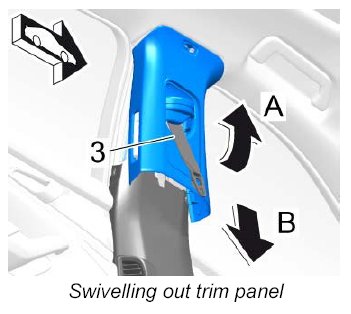
Remove trim panel.
| 4.1. | Swivel out trim panel -A- and remove it by pulling it downwards -B- |
| 4.2. | Feed the belt -3- through the opening in the cover panel. |
Installing upper part of B-pillar trim panel
INFORMATION:
- Check that all the fastening clips are positioned fully and correctly.
- Check that all the fastening clips are not bent or broken.
- Replace damaged or missing clips with new ones.
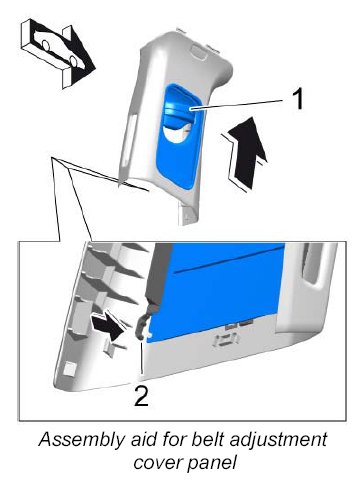
Move belt adjustment cover panel -1- into installation position.
| 1.1. | Push the belt adjustment cover panel -1- up. |
| 1.2. | Clip in locking lug -2- . |
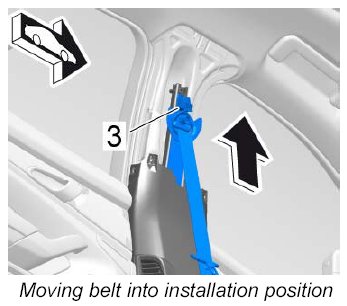
- Move the seat belt -3- to the top end position.
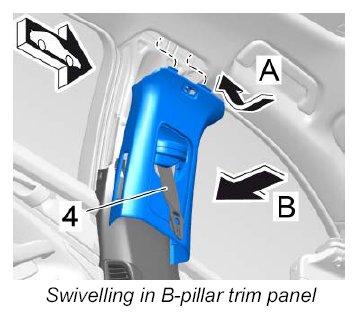
Install B-pillar trim panel.
- Feed the belt through the opening in the cover panel.
- Fit B-pillar trim panel at the top in the sheetmetal bracket.
- Swivel in B-pillar trim panel.
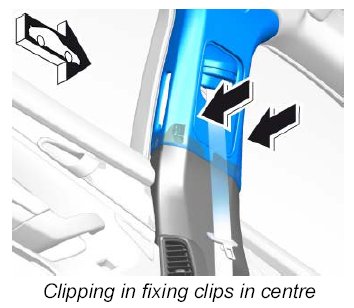
- Position centre fixing clips and clip in the trim panel.
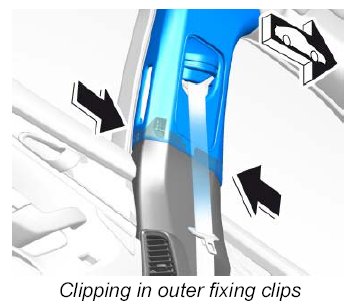
- Position outer fixing clips and clip in the trim panel.
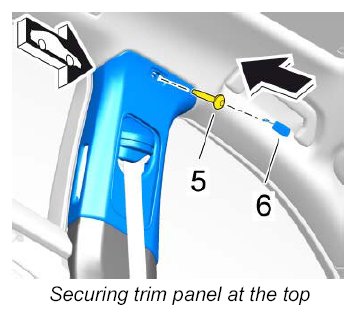
- Secure B-pillar trim panel at the top.
| 8.1. | Screw in fastening screw -5- |
- Tightening torque: 5.5 Nm (4 ftlb.).
| 8.2. | Clip in cover -6- . |
Subsequent work
- Secure belt fitting at the seat.
- Install cover for backrest.
- Install air vent in B-pillar.
Removing And Installing Lower Part Of B-pillar Trim Panel
Preliminary work
- Remove upper part of B-pillar trim panel.
- Remove air vent at B-pillar.
- Remove front part of inner door sill trim.
Removing lower part of B-pillar trim panel
INFORMATION: To reduce the unclipping forces and thereby the risk of damage during removal, the removal steps must be carried out at the accessible connection points using a suitable tool.
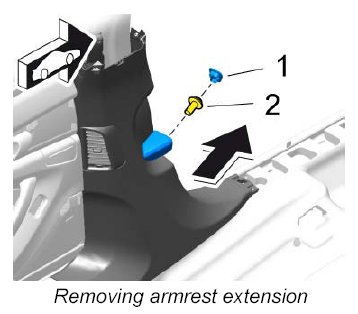
- Detach mounting for armrest extension.
| 1.1. | Lever out cover -1- for armrest extension. |
| 1.2. | Unscrew fastening screw -2- . |
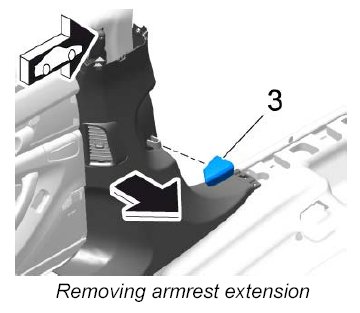
- Remove armrest extension -3- .
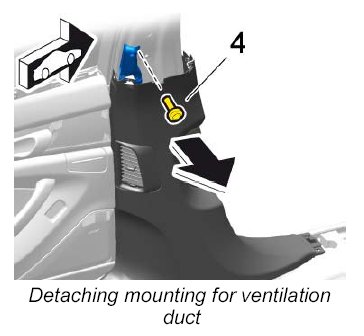
- Unscrew fastening screw -4- for ventilation duct.
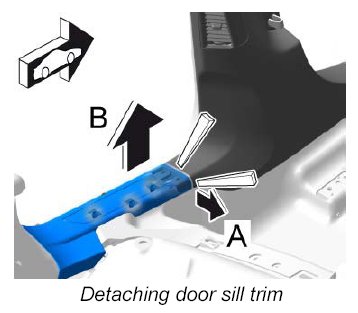
- Detach rear part of door sill trim at the front edge.
| 4.1. | Unclip inner locking lug -A- . |
| 4.2. | Loosen the three front clips on the door sill trim -B- . |
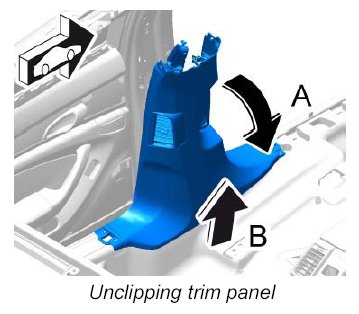
- Detach lower part of B-pillar trim panel.
| 5.1. | Lift up the rear section of the door sill trim. |
| 5.2. | Swivel lower part of B-pillar trim panel down -A- and unclip it -B- . |
Installing lower part of B-pillar trim panel
INFORMATION:
- Check that all the fastening clips are positioned fully and correctly.
- Check that all the fastening clips are not bent or broken.
- Check that all the fastening clips are not bent or broken.
- Lift up the rear section of the door sill trim.
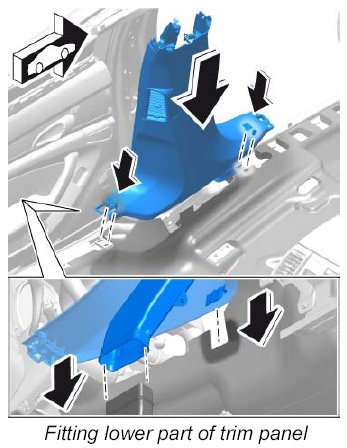
- Clip in lower part of B-pillar trim panel.

- Swivel B-pillar trim panel into place and clip it in.
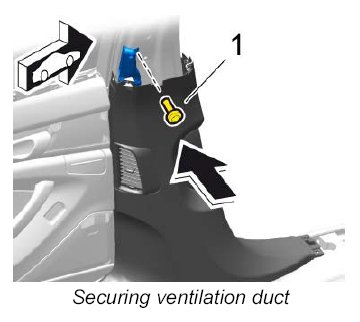
- Screw in fastening screw -1-
- Tightening torque: 5.5 Nm (4 ftlb.) for ventilation duct.
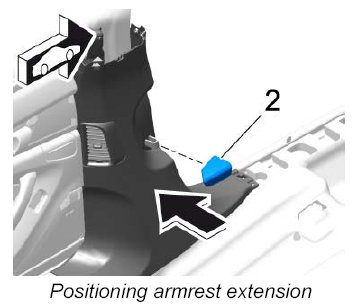
- Position the armrest extension -2- and align the door trim panel with the armrest contour.
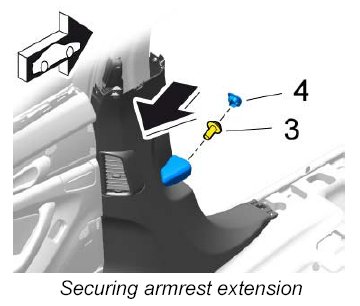
- Secure armrest extension.
| 6.1. | Screw in fastening screw -3- |
- Tightening torque: 5.5 Nm (4 ftlb.).
| 6.2. | Fit cap -4- . |
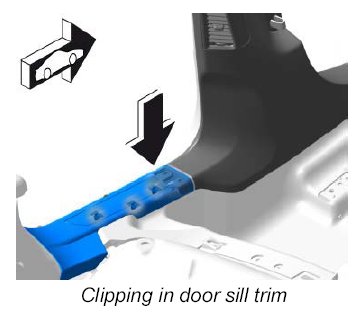
- Clip in rear section of the door sill trim.
Subsequent work
- Install air vent at B-pillar.
- Install front part of inner door sill trim.
- Install upper part of B-pillar trim panel.
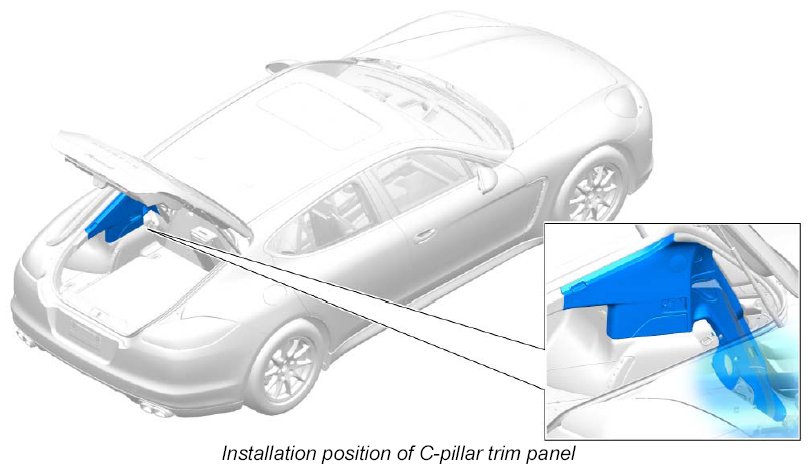
Removing And Installing C-pillar Trim (Trunk side Panels)
Preliminary work
Preliminary work – rear part of C-pillar trim
- Remove sun blind.
- Remove rear seat.
Preliminary work – front part of C-pillar trim
- Remove rear part of C-pillar trim.
- Remove rear part of door sill trim.
Removing rear part of C-pillar trim
INFORMATION: To reduce the unclipping forces and thereby the risk of damage during removal, the removal steps must be carried out at the accessible connection points using a suitable tool.
- Fold rear backrest forward.
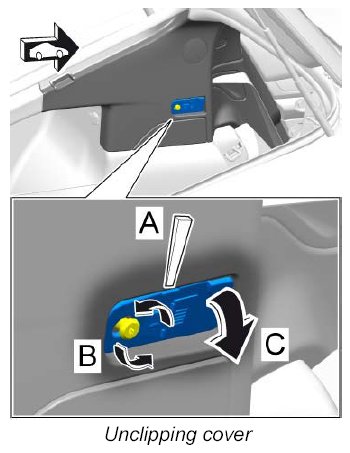
- Remove cover.
| 2.1. | Unclip cover -A- . |
| 2.2. | Loosen the bolts -B- . |
| 2.3. | Swivel out cover with bolts -C- and remove by pulling it upwards. |
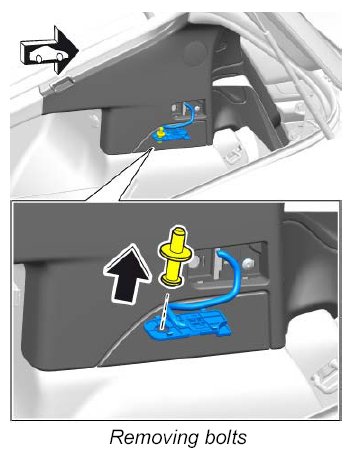
- Remove bolts from the cover.
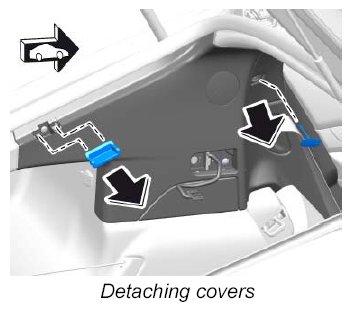
- Lever off covers.
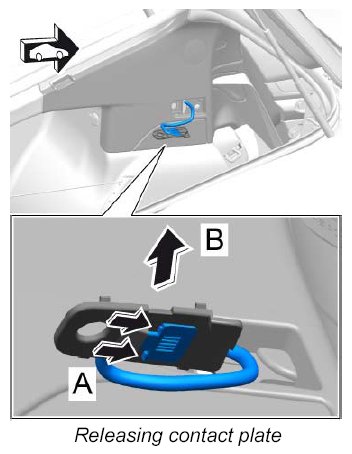
- Unclip contact plate -A- and remove it -B- (if fitted).
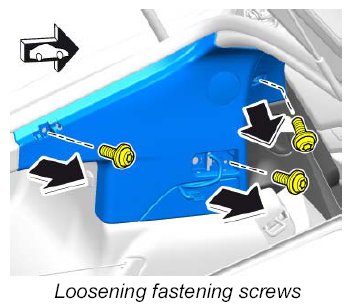
- Unscrew fastening screws.
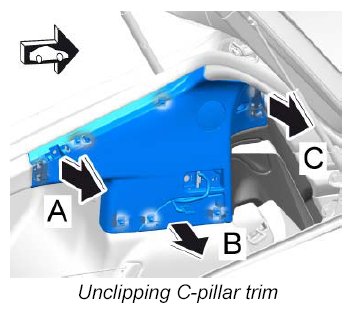
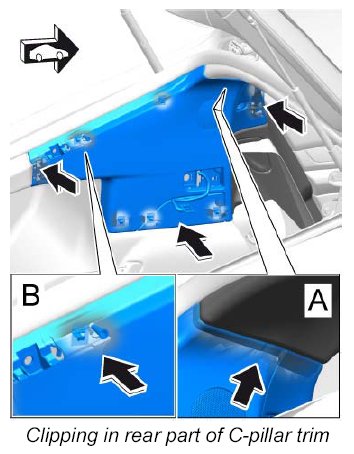
- Unclip trim panel.
| 7.1. | Unclip trim panel -A- . |
| 7.2. | Unclip trim panel -B- . |
| 7.3. | Unclip trim panel -C- . |
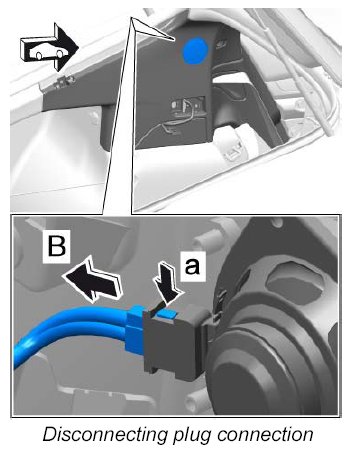
- Release plug connection for C-pillar loudspeaker -a- and pull it off -B- (if fitted).
- Guide contact plate through the trim panel (if fitted).
Removing front part of C-pillar trim
INFORMATION: To reduce the unclipping forces and thereby the risk of damage during removal, the removal steps must be carried out at the accessible connection points using a suitable tool.
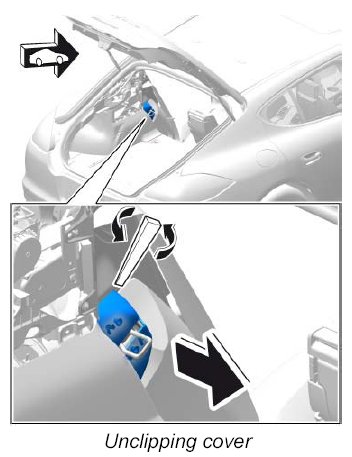
- Unclip cover for backrest adjustment mechanism.
- Move backrest into centre position.

- Unscrew fastening screw -1- for backrest section.
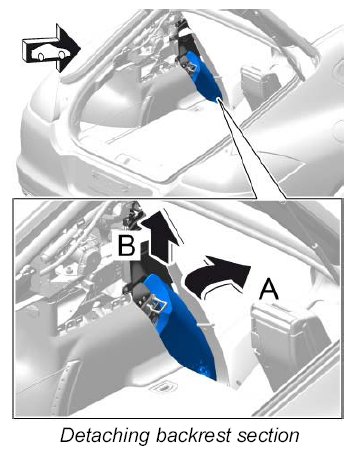
- Swivel backrest section forward and unclip it in an upward direction.
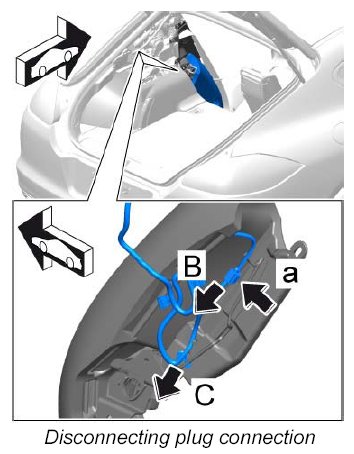
- Disconnect plug connection.
- Unclip electric wire harness at the C-pillar trim panel.
- Loosen fastening clip -C- .
- Release plug connections -a- and pull them off -B- .
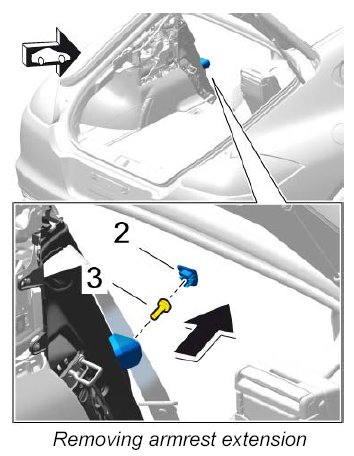
- Remove armrest extension.
| 9.1. | Lever out cover for armrest extension -2- . |
| 9.2. | Unscrew fastening screw -3- . |

| 9.3 | Remove armrest extension -4- . |
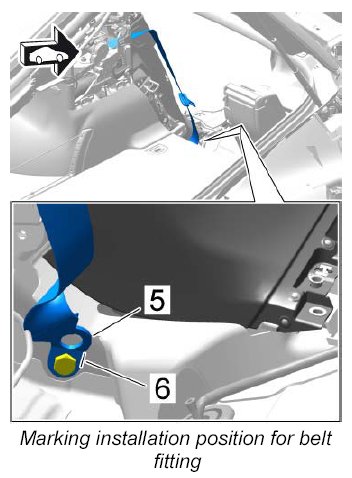
- Mark installation position for belt fitting -5- ( -6- ).
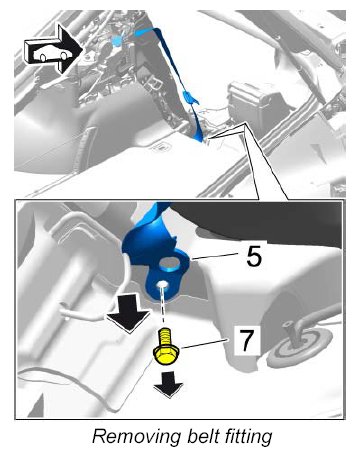
- Unscrew fastening screw -7- from belt fitting -5- .
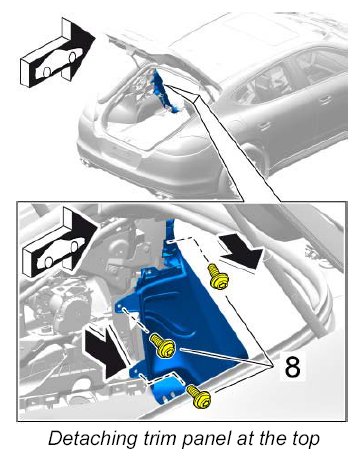
- Unscrew fastening screws -8- at the top.
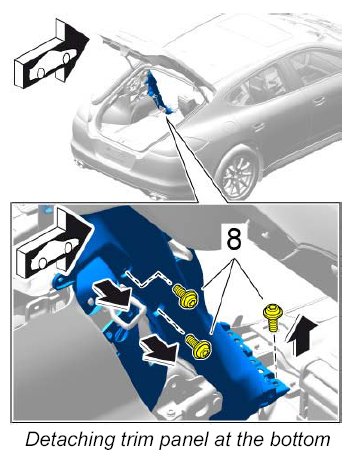
- Unscrew fastening screws -8- at the bottom.
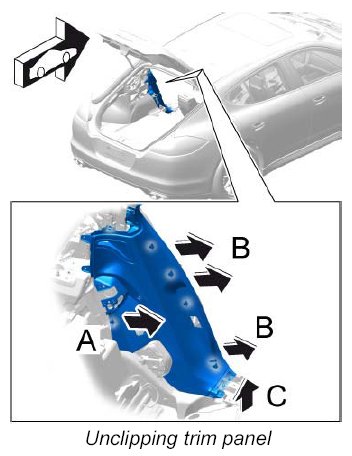
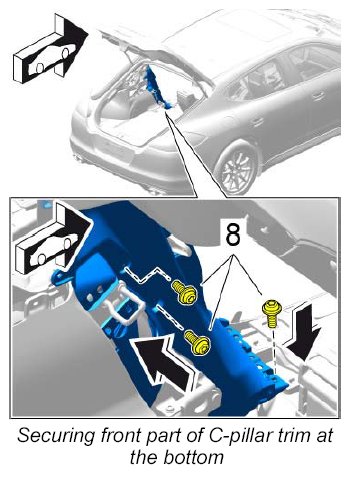
- Unclip front part of C-pillar trim.
| 14.1. | Loosen inner fixing clips -A- . |
| 14.2. | Loosen outer fixing clips -B- . |
| 14.3. | Loosen fixing clips at the bottom -C- . |
- Feed the belt through the opening in the trim panel.
Installing front part of C-pillar trim
INFORMATION:
- Check that all the fastening clips are positioned fully and correctly.
- Check that all the fastening clips are not bent or broken.
- Replace damaged or missing clips with new ones.
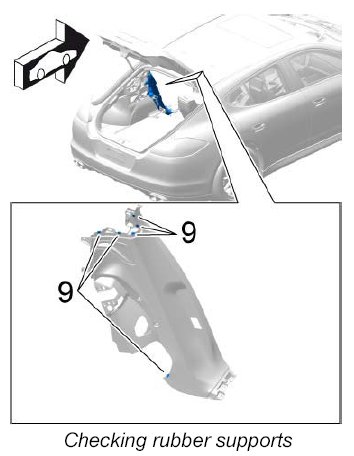
- Check that rubber supports -9- are fitted and check condition. Replace if necessary.
- Place front part of C-pillar trim in installation position -A- .
| 2.1. | Make sure that the speed nut is positioned correctly. |
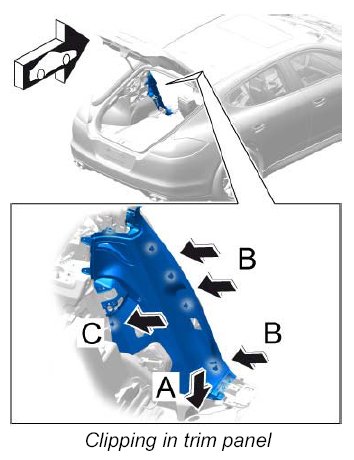
- Clip in front part of C-pillar trim.
| 3.1. | Clip in outer fixing clips -B- . |
| 3.2. | Clip in inner fixing clips at the bottom -C- . |
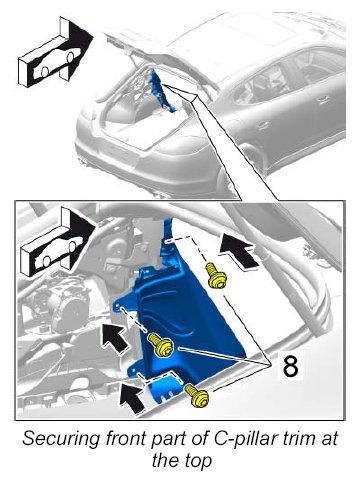
- Screw in fastening screws -8-
- Tightening torque: 1.7 Nm (1.5 ftlb.) at the top.
- Screw in fastening screws -8-
- Tightening torque: 1.7 Nm (1.5 ftlb.) at the bottom.
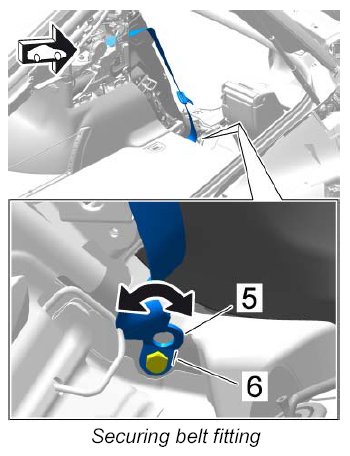
- Position belt fitting -5- at the marking -6- and tighten to
- Tightening torque: 50 Nm (37 ftlb.).
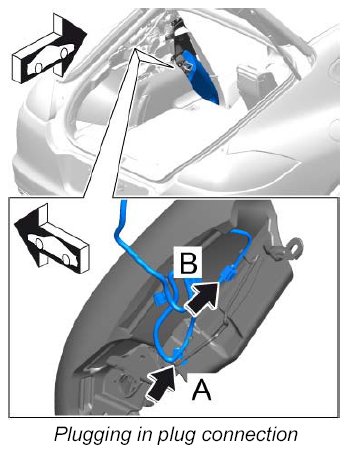
- Secure plug connection.
| 7.1. | Clip in wire harness -A- . |
| 7.2. | Connect plug connection until it engages securely -B- . |
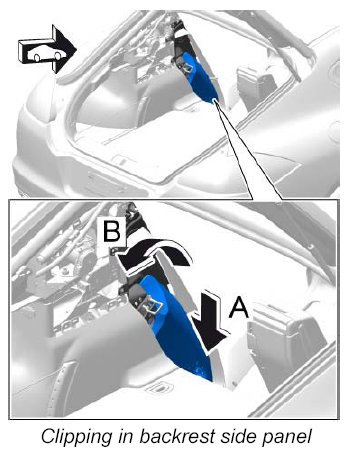
- Clip in backrest side panel -A- and swivel it into position -B- .
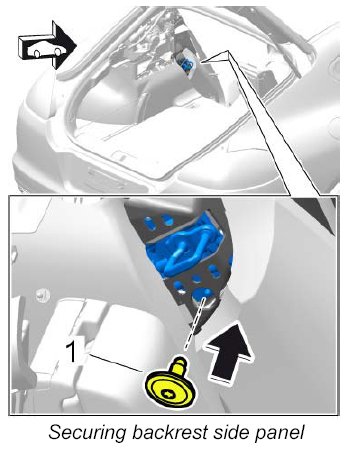
- Tighten fastening screw -1-
- Tightening torque: 10 Nm (7.5 ftlb.)±1 Nm (±0.5 ftlb.) on backrest side panel.
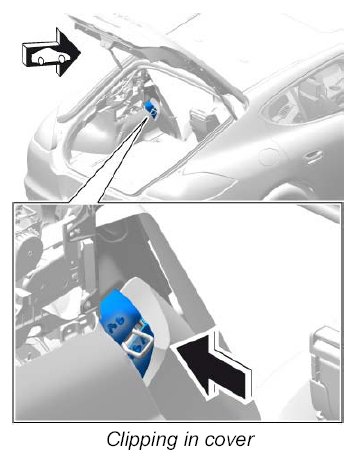
- Clip in cover.
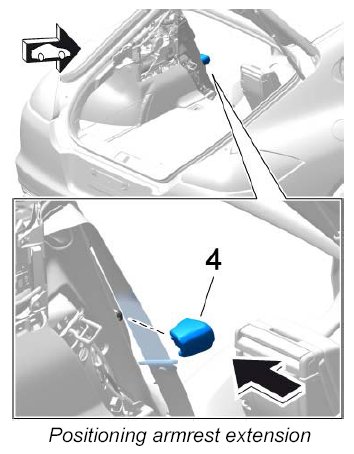
- Position armrest extension -4- and align the door panel according to the armrest contour.
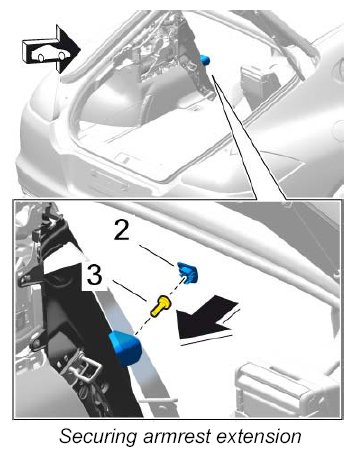
- Secure armrest extension.
| 12.1. | Screw in fastening screw -3- |
- Tightening torque: 5.5 Nm (4 ftlb.).
| 12.2. | Press in cover -2- . |
Installing rear part of C-pillar trim
INFORMATION:
- Check that all the fastening clips are positioned fully and correctly.
- Check that all the fastening clips are not bent or broken.
- Replace damaged or missing clips with new ones.
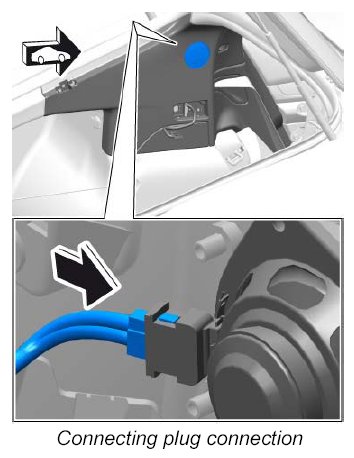
- Connect plug connection for loudspeaker until it engages securely.
- Guide contact plate through the opening in the trim panel.
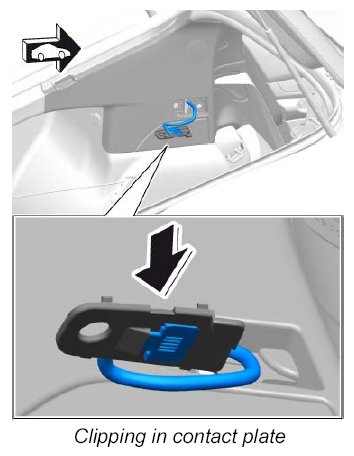
- Clip contact plate into the cover.
- Secure rear part of C-pillar trim.
| 4.1. | Place trim panel in installation position -A- and -B- . |
| 4.2. | Clip in trim panel. |
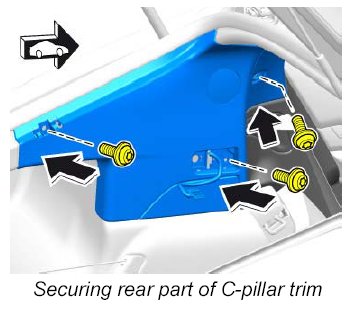
- Screw in fastening screws
- Tightening torque: 5.5 Nm (4 ftlb.).
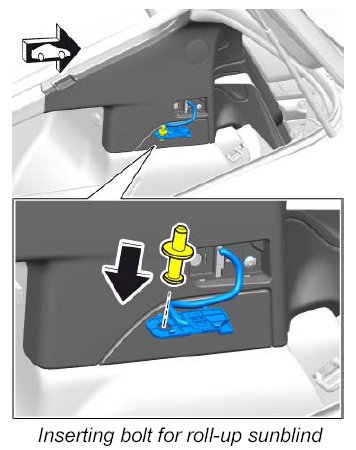
- Insert bolt for roll-up sun blind in the cover.
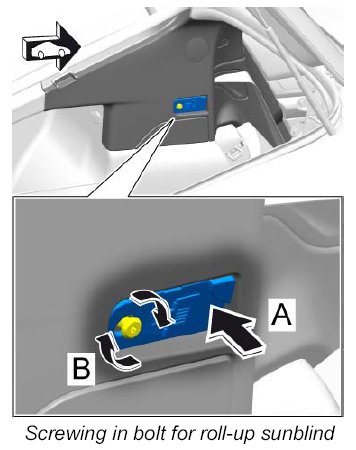
- Screw in bolt for roll-up sun blind
- Tightening torque: 12 Nm (9 ftlb.), -B- .
- Clip in cover -A- .
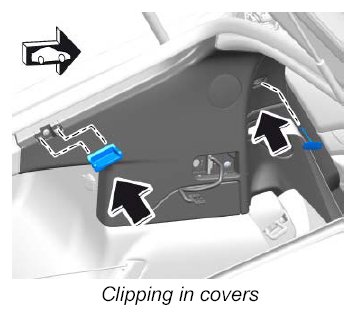
- Clip in covers.
Subsequent work
Subsequent work – front part of C-pillar trim
- Install rear part of C-pillar trim.
- Install rear part of door sill trim.
Subsequent work – rear part of C-pillar trim
- Install sun blind.
- Install rear seat.

")


")
")

